Tuesday, December 20, 2011

CASEing for Christmas

Catherine Pooler shared a great video series on cards that were easy to mass-produce.   I added a little to her idea, and used some retired products, because they needed to get used up, but also some things anyone can still get their hands on!    Made several versions, because everyone has different tastes, and honestly, I'm easily bored!


My vintage versions use...
Tools:  Ornament Punch, Framed Tulips Embossing Folder
Paper:  Crumb Cake CS, retired Hostess patterned paper in Concord Crush
Stamp :  Petite Pairs


Ribbon:  Whisper White 3/8" Taffeta
Ink:  Concord Crush 


 Ribbon:  retired Theater Originals in Old Olive
Ink: Old Olive
The contemporary versions use Whisper White cardstock and a Poppy Parade DSP from the same retired Hostess pack.   I embossed the lines on the edges with the Simply Scored (only had it a few weeks but I already love that thing!)  The sentiment is stamped in Old Olive using the Short and Sweet set.  Matching 1/4" grosgrain ribbon.


Did I mention that the card front with the ornament shape punched out is raised with dimensionals, while a 2"x2" square of patterned paper is adhered to the card beneath?   Yeah, that's sort of important to know if you want to replicate either of these cards!   And the cool part is, I have all the ornament shapes left to make gift tags with.  Sweet.

Thursday, December 15, 2011

Holy Moly! Clearance Rack Blitz!


Very excited, placed my order already for some new toys (LOTS of punches on that Rack right now!) and to restock on some old favorites that I'll show you in the projects below:


This 12x12 page uses the Botanical Gazette Designer Series Paper (on the Clearance Rack now) and the Nature Walk stamp set - perfect for my heritage album.   The page I'm showing here has a secret - a panel that is held closed with a gorgeous Antique Brad to make room for journaling about my great-grandparents; don't they look like a cheery couple!!   Very interesting people, tho, so lots to say about them, and these are the only photos I have of them, so lots of room for their story in that hidden panel is great.  Other current Stampin' Up! products used include:  Textured Cardstock in Early Expresso, Victoria Crochet Trim, Framed Tulips Embossing Folder (journaling block and photo corner)


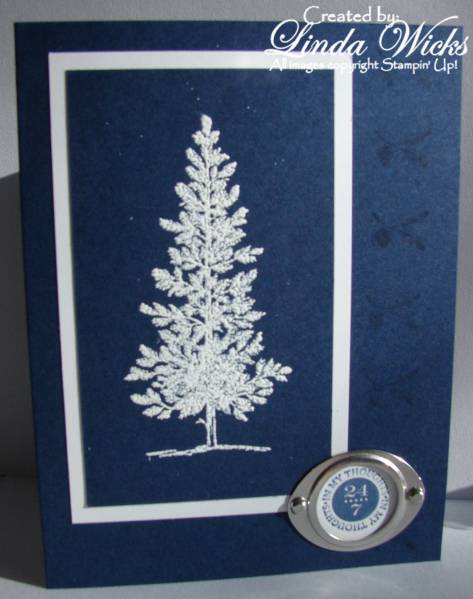
This card uses the Lovely as a Tree stamp set, of course, embossed in white on Night of Navy, which sets off the silver Hodgepodge Hardware beautifully, I think.  The Hardware is also available in Vanilla; both silver and ivory come in a huge set of different shapes and brads, in a great re-usable tin.


Wednesday, December 7, 2011

Finding some Christmas spirit

Been feeling utterly blah and out of Christmas spirit so far this year.   You'd think with 2 young kids I'd be excited, but I have been feeling utterly uninspired.   I've been looking at pretty cards other people have made (the Artistic Avenger in particular), and thought I should just sit down at my craft table and MAKE one already!   I knew I wanted to emboss Dasher in gold on red, and the ribbon was on the Clearance Rack last month, and the rest of the design grew from there.   Not really a card for mass production which is probably what I should be working on, but I'm happy with it!   Maybe I could open a box or two of decorations now!


This card is made exclusively with Stampin' Up! products :)


Stamps:  Dasher (golden focal image), Perfect Punches (sentiment), Triple Treat Flower (in gold on green CS)
Cardstock:  Very Vanilla, Riding Hood Red, Garden Green
Ink:  Versamark & Riding Hood Red
Accessories:  Gold Stampin' Emboss powder, retired striped grosgrain ribbon in Riding Hood Red
Tools:  Framed Tulips Embossing Folder, 1 3/4" Scallop Circle Punch, 5-petal flower punch (for leaf), Heat Gun 

Friday, December 2, 2011

Simple, pretty & super INexpensive cellphone skin!

I needed a new cellphone, and asked my husband to get me a basic phone.   He surprised me with a touchphone, and I was more excited about the fact that I'd be able to personalize it than I was about it's fancy features!   Inspired by a YouTube video, I got a clear snap-together case, traced through the front of it onto the back side of my Paisley Petals DSP, and cut it out.   Again using the case as a template to trace onto the back of the paper, I marked a circle for the camera hole and used a 1/2" circle punch on that.    I added my initial on a piece of vellum, since I wanted to see the pattern, but didn't want the initial to get totally lost.   Then, of course I inked the edges of everything with Marina Mist and Night of Navy.   I love my purty new phone, and when I get bored with it, I have TONS of other choices in my stash of papers.


I made a matching business card holder, too - not as happy with how that came out, since I don't have a tiny alphabet stamp, I just wrote my initial, and my laminating machine put a wrinkle on the DSP... still 100x prettier than what I found in the clearance bin at the office supply store, tho!   I had to pry off a really ugly epoxy sticker that covered the whole front before I could adhere my paper...


Thursday, November 24, 2011

Happy Thanksgiving!

Hope today finds you with many things to be thankful for.   I'm happy to be closer to family this year, and on my way to my aunt's for a wonderful Thanksgiving dinner later today.   I made this last night to give to her as a little hostess gift.   The candle is wax, but it has an electric votive inside, so very safe!   I don't know about you, but I don't think I've ever seen a project made with Spice Cake Designer Series Paper that I didn't like, so it seemed like a no-brainer to use for this project.  I'm one of those stampers who feels the need to ink distress the edges of everything, preferably in 2 or 3 colors of ink; here I used Pool Party, More Mustard, Soft Suede and Chocolate Chip.   Sentiment from Day of Gratitude.  Punches:  Decorative Label and Lace Border.   Beautiful Antique Brad - I love those things.    Next time maybe I'll put a knot or bow of the Crochet Lace &/or Linen thread - oooooh!   I think I need to make another one of these soon!


Dimensionals used to adhere label to strip of paper and Sticky Strip to adhere paper to the candle.

Wednesday, November 23, 2011

Day of Gratitude

I'm thankful for many important things, my wonderful family, our health, but I'm also thankful for some small and relatively silly things, one of which is that the stamp set I used on this project was carried over from last year's Holiday Mini.  In case you don't know, it's called Day of Gratitude.   I was playing around with different techniques as I made many similar versions of this card for Meals on Wheels.   There were several that got lots of sponging on the edges of the card, but I wasn't crazy about them, so no photos.   Maybe these need an Antique Brad in the middle, tho, don't you think?

Cardstock:  More Mustard
Technique:  Emboss Resist, scoring
Ink:  Early Espresso, Bravo Burgundy, Cajun Craze, Old Olive
Tools:  Decorative Label Punch, Stampin' Emboss powder


Cardstock:  More Mustard
Technique:  Rock n Roll, scoring
Ink:  Bravo Burgundy, Cajun Craze,  Chocolate Chip for  sentiment
Tools:  Decorative Label Punch


To purchase the items used in making these cards and other items available in this week's Online Extravaganza, click the button on the right.


Sunday, November 20, 2011

I Adore Simply Adorned!

I love decorating for the holidays, and Simply Adorned lets me decorate myself without looking like I'm in the Tackiest Outfit Contest at work!  Inserts are quick and fun to make, easy to coordinate to outfits, seasons and events.

This one uses Pumpkin Pie and Old Olive Cardstock.   Stamped the spiderweb from Spooky Bingo Bits onto the orange, the spider onto the green (yes, it was tough to cut out even with Paper Snips, but so worth it!).   Colored the rhinestone with a purple Sharpie to get all the Halloween colors in!

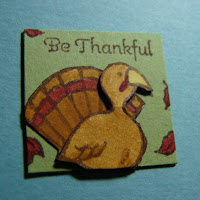
I love this little Turkey from the Gift Givers stamp set!   I stamped him once onto Pear Pizzazz and twice onto Whisper White, colored, cut and layered to give it some dimension and interest.


Another image from Gift Givers - the cute reindeer - stamped 3 times, cut and layered and some Crystal Effects added to the nose for more dimension.   The sentiment is from Short and Sweet.


 This last insert shows how tiny these pieces are, which is why they come together so quickly!   Here I layered the cupcake from Short and Sweet, framed it with one of the images from Four Frames, and embellished with a tiny pearl colored with a Sharpie - sweet!
 

Sunday, November 6, 2011

More MDS fun!

After I posted my owl thank-you card the other day, I started thinking that he really should be a turkey, since Thanksgiving is just a few weeks away.   One of the reasons I own the owl punch both as a physical item and a digital download is because the guy is not only cute, but really versatile as well.   Trim off the ears, add some tail feathers, and voila, turkey!
Here's another great thing about My Digital Studio.   Remember all those wonderful colors that Stampin' Up! retired?  Well, they're right here in MDS!  This card uses Creamy Caramel, Cajun Craze, Really Rust, and More Mustard.

What about great stamp sets that you missed out on, or beautiful Designer Series Papers that are no longer made?   Lots of them are available as MDS downloads, too.   This tag uses elements from the current Hostess product, Cheerful Treat Digital Content CD, as well as a sentiment from All Holidays, which is only available as a digital download.


Remember, Monday is the last day to get your FREE downloads from MDS!

Thursday, November 3, 2011

MDS Freebies unveiled


For the next 3 days, Stampin' Up! is offering four brand-new digital downloads to everyone, for free, so of course I snatched those right up and made some stuff right away!   Gotta love how quick it is to create with My Digital Studio.


This cute card uses the free So Typefelt Stampbrush set along with a card template I got when I purchased the Owl Punch download for a mere 95 cents!   That's another thing I love about digital - the supplies are so inexpensive, and store compactly right inside my computer.  Unlike my real craft room, everything is always in it's place in the digital craft room!
This scrapbook page looks professionally done because it is!   I just popped a couple of photos into the free Delight in the Day Designer Template Page, added my journaling to the  text box, and DONE.   On the owl card, I switched up the colors and embellishments to personalize the project, or you can start completely from scratch to create your own projects.   Sometimes I like instant gratification, and sometimes I want to make something truly unique and lose myself in the process.  With MDS, I can do both.


Starting November 8th, 2011, they will still be available, but not for free!


Saturday, October 29, 2011

Halloween Treats!

Spooky Bingo Bits

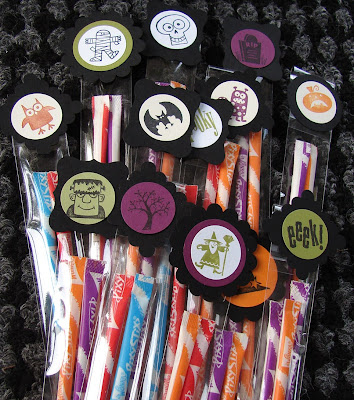
This stamp set was one of the first to go on my "gotta have" list when I got this year's Idea Book and Catalog.  Then, when I saw the 1x8 cello bags in the Holiday Mini, I knew I had been right.   I mean, aren't these the cutest?   The Cub Scouts and their parents thought so!

 Yes, my Christmas cactus is very confused!

Colors of ink and cardstock: Basic Black, Old Olive, Rich Razzleberry, Pumpkin Pie
Punches:  1" circle, 1 1/4" circle,  Scallop Circle, Curly Label, Scallop Square

All products used available from Stampin' Up!   

Wednesday, October 26, 2011

My Digital Studio - FREE downloads from Stampin' Up!

Whoo-hoo!!!   Free MDS content for everyone!   Seriously.   Stampin' Up! will be giving away free downloads for digital scrapbooking software next week!   Since I'm a demonstrator, I was able to download them just NOW.   Can't wait to play with them in My Digital Studio and show you what I made.   That will have to wait until I finish the treats for my son's Scout Troop and his Lego Batman costume, however.   Hope to see you next week :)

Saturday, October 22, 2011

Llama Holiday Blog Hop

You probably arrived here from Kath's blog.  If not, make sure you check out the gorgeous projects she created!

Gift Givers - cutest set in the Holiday Mini!   I love this adorable and versatile set, and it seemed like the perfect thing to showcase for our Llama all-holiday hop.

Halloween decor or treat holder


My son's teacher and his Den Mother will both be getting one of these  little hats very soon!  I was really torn this year trying to decide "witch" die to order for my Big Shot.  I finally decided on the Petal Cone die, because I was so impressed with how versatile it is.   Not just pretty Victorian-style treat-holders, you can also make hats, baskets, hearts, carrots, and maybe even more things I haven't seen yet.   Here I used 2 1/2 die cuts instead of the usual 2 to make a hat with a pentagon base instead of a square base.  Can't find my circle cutter yet (I moved a few weeks ago), so I traced a dessert plate onto the Basic Black cardstock for the brim.   Sadly, they retired all the Halloween colors of striped grosgrain ribbon, tho they do still make it in black... 


Thanksgiving napkin ring


Used the Lace Ribbon Border Punch on Chocolate Chip cardstock to make this super-easy napkin ring.   Just glue the ends together, then glue on the funny little turkey.   I don't have the Curly Label Punch yet... better put it on my next order so I can whip up a couple dozen of these for my family's holiday get-togethers!    The napkin is embossed with the Finial Press folder.


Christmas Card


I got some of these oh-so-pretty Everyday Elegance Simply Sent kits during the October promotion.   If you buy 2 kits before the end of the month you can choose one of the coordinating stamp sets FREE.   Here, tho, I'm using a sentiment from the Short and Sweet set.  I used Chocolate Chip and Poppy Parade markers to ink the reindeer from the stocking in the Gift Givers stamp set, punched out the image with the 1 3/8" Circle Punch, and accented with a Scalloped Circle in Poppy Parade and a little 5/8" ribbon.  Easy-peasy, lemon squeezie!


Friday, September 9, 2011

Do the Llama Hop!

Welcome to an All Natural stop on the Llama Blog Hop!

You probably arrived here from Darrah's blog.

Poppy Garden


Using Chocolate Chip ink, I brayered the raised image from the Flower Garden embossing folder and sponged around it.  Colored in with More Mustard, Pumpkin Pie, Poppy Parade, Old Olive and Pear Pizzazz markers.  The image seemed to want an artsy, distressed background, so I started tearing my Confetti White cardstock, and the Pear Pizzazz cardstock.   The poor Poppy Parade (say that 5 times fast, Buffy!) got run thru the Big Shot with a Texturz Plate, then crumpled, ink distressed, ironed and torn.   A little Hemp Twine to embellish, and finally, I just couldn't seem to stop with the inking and tearing, so the Confetti White card base got that treatment as well.  


Simply Nature


I've made a lot of inserts for my 1"x 1" Simply Adorned Charm, and at first, I fell into this trap of thinking that only tiny images would work.  These OTOH, are both made with the Nature Walk stamp set.  To make the first one, I stamped the butterfly wings three or four times kinda randomly on my little square, then sponged them with More Mustard, Pumpkin Pie, and a touch of Cherry Cobbler.   Sponged with Marina Mist around the top of the insert, and done!!   I love how quickly I can make a wearable piece of art.

The bird from Nature walk was stamped in Cherry Cobbler on Very Vanilla and cut out.   I sponged the edges and colored in the beak.  Then I used a black colored pencil on the eye, then a nice round spot of Crystal Effects; it's hard to tell from this picture, but it looks so much like a real bird eye, nice and dark and shiny.   The bird is attached with glue dots to give the insert a little dimension.   The background is Botanical Gazette DSP (retired) but I could have used the flower stamp from Nature Walk for a similar background.